Помогите разобраться. Проверяю на наличие зазоров CD. Создаю образ в несжатом виде + cue. Получается хххх.wav + xxxx.cue. В куе заносятся данные о зазорах. Дальше я конверитрую хххх.wav в хххх.flac через foobar, но не через cue помещенный в foobar, а через xxxx.wav файл. В этом случае зазоры будут учтены?
» Exact Audio Copy (ExactAudioCopy, EAC)
ArtemijG
Если воспроизводить flac будешь через cue то точно будет все нормально!
Если воспроизводить flac будешь через cue то точно будет все нормально!
ArtemijG
Простое кодирование\декодирование из одного lossless формата в другой ничего не изменяет.
Простое кодирование\декодирование из одного lossless формата в другой ничего не изменяет.
timo_2007
Да, cue будет встроенным в flac.
SoftGiant
Вы меня не поняли. cue файл находиться отдельно с информацией о зазорах. Сам wav файл такую информацию не несет. Так вот я спрашивал, будет ли при преобразовании wav файла (без cue) учтена информация о зазорах.
timo_2007
Stop. cue должен оставаться от wav файла? Дело в том, что я кодирую во flac с встроенным cue.
ArtemijG
Ты должен понять суть процесса, тогда жонглирование форматами и куями перестанет быть для тебя проблемой.
Если ты сграбил трек ЕАСом в WAV, у тебя есть аудиоданные, скажем, длиной в 5 мин, плюс подцепленный к ним зазор перед следующим треком, скажем, 2 с.
От того, что ты сжал данные во flac, ничего не изменится.
Плеер проиграет твои 5 мин данных и 2 с паузы, потом начнет играть следующий трек.
Если ты запишешь трек на диск, получишь 5 мин аудио + 2 с паузы.
Таким образом, при потрековом рипе информация о треках/зазорах в куе никакой значимой роли не играет.
Если рипать в единый образ - все совсем наоборот: узнать, где начинается следующий трек можно ТОЛЬКО из куя.
ArtemijG
Miken уже обьяснил,что сам wav сделанный образом не несет не какой инфы,все в "cue".а посему для конвертации используй сам "cue" если прога имеет такую поддержку.
Miken уже обьяснил,что сам wav сделанный образом не несет не какой инфы,все в "cue".а посему для конвертации используй сам "cue" если прога имеет такую поддержку.
И еще. Вот создал я образ согласно инструкции с помощью EAC, c оффсетами и зазорами. Оффсет - 102, зазоры около 3 сек общей длительностью. (учитывая первый зазор который равен 2 секундам). Зазоры добавляются к предыдущему треку по умолчанию. Почему в таком случае общая длительность образа равна такому же рипу, но сделанному через фубар без оффсетов и зазоров. По идее они должны отличаться на миллисекунды хотя бы. Ан нет. Вот длительность образа сделанного через EAC 1:17:43.827 (205 674 756 samples) и точно такая же сделанная через фубар без свистоплясок. В чем дело?
ArtemijG
А что вам мешает рипать EAC'ом сразу во флак?
Зазоры кстати более важны для потрековых рипов, поэтому вы разницы и не видите между двумя образами
А что вам мешает рипать EAC'ом сразу во флак?
Зазоры кстати более важны для потрековых рипов, поэтому вы разницы и не видите между двумя образами
XXxxalllexxXX
Это все равно не ответ на поставленный вопрос.
И вообще, что значит "более важны"? Есть cue в котором эта информация прописана, как мне объяснили. Он либо есть, либо его нету.
Это все равно не ответ на поставленный вопрос.
И вообще, что значит "более важны"? Есть cue в котором эта информация прописана, как мне объяснили. Он либо есть, либо его нету.
ArtemijG
По большому счету все эти зазоры и прочее нужны для записи образа на болванку что бы получить максимально точную копию оригинала,тебе же нужен сам образ для прослушивания со встроенным cue,а посему замарачиваться на этих зазорах не стоит,на качестве звука это не как не повлияет!))
По большому счету все эти зазоры и прочее нужны для записи образа на болванку что бы получить максимально точную копию оригинала,тебе же нужен сам образ для прослушивания со встроенным cue,а посему замарачиваться на этих зазорах не стоит,на качестве звука это не как не повлияет!))
timo_2007
Да, на качестве звука это не повлияет, но я выкладываю образы на трекеры, а там люди придирчивые. Да и самому хочется иметь точную и правильную копию своих дисков.
И все равно я не пойму! Почему рип с оффсетом в 102 равен по продолжительности рипу без настройки оффсетов? Зачем тогда нужна эта настройка и ACCURATERIP? Ведь оффсет это и есть временное смещение? Я правильно понимаю?
ArtemijG
Разница будет если смотреть значение CRC в логе.
по поводу смещения прочти тут: http://eac.h12.ru/12.shtml
Разница будет если смотреть значение CRC в логе.
по поводу смещения прочти тут: http://eac.h12.ru/12.shtml
ArtemijG
Если я правильно понимаю, то при граблении дисков происходит так:
1. считывается TOC, которая определяет общую структуру, продолжительность, начало и конец записи
2. при считывании всё, что не содержит инфу в начале и конце диска добивается, с настройками по умолчанию, нулями (тишиной), поэтому продолжительность одна и та же; количество же полезной информации зависит в т.ч. и от правильно выставленного оффсета: при больших его значениях (как "+", так и "-") ты можешь потерять минимальное количество НЕтишины в начале или конце диска + могут быть проблемы с зазорами (в сграбленном тобой диске, например, треки могу начинаться не с начала +/- доли или единичны секунды; представь, что у тебя есть полоса бумаги в 30 см., чистая - это полученный WAV-файл, и есть некая линейка с делениями тоже 30 см. - это TOC, накладываешь и получаешь фигню, т.к. WAV-файл, т.е. собственно звуковую информацию ты считал, не учитывая оффсет, так, что потерял что-то в начале или в конце на размер оффсета и там, где у тебя по TOC должно быть начало нового трека, в действительности - конец предыдущего, или начало нового +"какая-то величина", равная оффсету")
ArtemijG
Цитата:
Тут я конечно слегка погорячился, для образов они тоже важны. Я хотел сказать, что при потрековом рипе можно потерять эти секунды тишины, а при рипе образом они никуда не денутся, т.е всё (тишина и треки) склеивается в один большой файл. Поэтому и длительность у ваших образов получилось одинаковая. Но при отсутствии информации о зазорах в куе, как правильно заметил timo_2007, вы не сможете восстановить точную копию диска после записи на болвань.
Цитата:
И вообще, что значит "более важны"? Есть cue в котором эта информация прописана, как мне объяснили. Он либо есть, либо его нету.
Тут я конечно слегка погорячился, для образов они тоже важны. Я хотел сказать, что при потрековом рипе можно потерять эти секунды тишины, а при рипе образом они никуда не денутся, т.е всё (тишина и треки) склеивается в один большой файл. Поэтому и длительность у ваших образов получилось одинаковая. Но при отсутствии информации о зазорах в куе, как правильно заметил timo_2007, вы не сможете восстановить точную копию диска после записи на болвань.
timo_2007
Почитаю статью, спасибо. Разница в CRC в логе естественно есть.
Maxim_um
Спасибо за объяснение, попробую вникнуть и позже отписаться.
XXxxalllexxXX
Вроде как понял.
Тут еще мысль такая пришла ко мне. Практически во всех CD первый трек имеет зазор в 2 сек. Эти данные почему то в cue не отображаются. Вот к примеру cue любого трека кроме первого c зазором выглядит так:
TRACK 16 AUDIO
TITLE "My Medicine"
REM REPLAYGAIN_TRACK_GAIN -10.29 dB
REM REPLAYGAIN_TRACK_PEAK 0.988556
INDEX 00 55:58:07
INDEX 01 55:58:53
(Тут как бы коню понятно, что зазор равен 46 сантисекундам. (правильно я выразился?))
А первый трек несмотря на то что имеет 2 сек. зазор отображается следующим образом:
TRACK 01 AUDIO
TITLE "A Word Witchya! (Intro)"
REM REPLAYGAIN_TRACK_GAIN -7.03 dB
REM REPLAYGAIN_TRACK_PEAK 0.988556
INDEX 01 00:00:00
TRACK 02 AUDIO
TITLE "Press Play"
REM REPLAYGAIN_TRACK_GAIN -10.20 dB
REM REPLAYGAIN_TRACK_PEAK 0.998535
INDEX 01 01:20:44
Как видите продолжительность первого трека равна 01:20:44. (согласно cue) Но! Если проверить свойства этого трека с помощью foobar2000 то его продолжительность равна 1:20.587 (3 553 872 samples) Бред какой то. Разница ведь должна быть в 2 сек. А тут отличие в миллисекунды. Одному в этой галиматье не разобраться. Буду рад помощи)
ArtemijG
Зачем так заморачиваться то? Мой вам совет - переходите на потрековые рипы. Такие рипы являются стандартом на лучших трекерах музыкальной направленности. Да они и более удобны, так как без проблем воспроизводятся на портативных устройствах и стационарных медиаплеерах, чего не скажешь о рипах образом. В ближайшем будущем, я думаю, потрековые релизы окончательно вытеснят релизы образом. Если вдруг надумаете, то могу скинуть инструкцию по настройке EAC'а с небезызвестного What.cd
Зачем так заморачиваться то? Мой вам совет - переходите на потрековые рипы. Такие рипы являются стандартом на лучших трекерах музыкальной направленности. Да они и более удобны, так как без проблем воспроизводятся на портативных устройствах и стационарных медиаплеерах, чего не скажешь о рипах образом. В ближайшем будущем, я думаю, потрековые релизы окончательно вытеснят релизы образом. Если вдруг надумаете, то могу скинуть инструкцию по настройке EAC'а с небезызвестного What.cd
XXxxalllexxXX
Это только на забугорных сайтах предпочтение отдается по трековому рипу!Где то читал что это в связи с пиратством.якобы потрековой рип не является копией диска в отличии от рипа снятого образом,как то так.Возможно кто то просто пошутил и написал такое!
Это только на забугорных сайтах предпочтение отдается по трековому рипу!Где то читал что это в связи с пиратством.якобы потрековой рип не является копией диска в отличии от рипа снятого образом,как то так.Возможно кто то просто пошутил и написал такое!
XXxxalllexxXX
Я не заморачиваюсь, мною просто движет интерес) Потрековые рипы - хорошее дело. Всегда можно поделиться отдельными треками к примеру без лишних манипуляций. Но у меня вся моя музыкальная коллекция уже в образах flac+embedded cue. Меня устраивает.
Инструкцию скиньте. Буду признателен.
Я не заморачиваюсь, мною просто движет интерес) Потрековые рипы - хорошее дело. Всегда можно поделиться отдельными треками к примеру без лишних манипуляций. Но у меня вся моя музыкальная коллекция уже в образах flac+embedded cue. Меня устраивает.
Инструкцию скиньте. Буду признателен.
timo_2007
Цитата:
Это чья то злая шутка. Скорее всего этот человек просто не любит потрековые релизы или просто элементарно не умеет правильно настроить EAC)
ArtemijG
Вечером в лс скину. Кстати если есть свои диски, то могу пригласить вас на [more=Waffles.fm]
Описание: музыкальный
Контент: музыка, адиокниги, приложения MAC, Windows, Linux
Формат музыкального контента: flac, mp3, ac3, aac, dts
Возможность парковки аккаунта: присутствует
Регистрация: по инвайтам
Статистика на 02.07.2010

Жанры

Поиск по тэгу flac

Правила

FAQ

[/more]
Цитата:
Возможно кто то просто пошутил и написал такое!
Это чья то злая шутка. Скорее всего этот человек просто не любит потрековые релизы или просто элементарно не умеет правильно настроить EAC)
ArtemijG
Вечером в лс скину. Кстати если есть свои диски, то могу пригласить вас на [more=Waffles.fm]
Описание: музыкальный
Контент: музыка, адиокниги, приложения MAC, Windows, Linux
Формат музыкального контента: flac, mp3, ac3, aac, dts
Возможность парковки аккаунта: присутствует
Регистрация: по инвайтам
Статистика на 02.07.2010

Жанры

Поиск по тэгу flac

Правила

FAQ

[/more]
Потрековый рип удобнее цельного образа. Я сам когда-то делал вторым способом, но давно отказался.
Да и в хардверный плеер могу закинуть треки во флаке без доп. обработки.
Да и в хардверный плеер могу закинуть треки во флаке без доп. обработки.
MikeN
Перечитайте снова мое сообщение и при этом забудьте все что мы обсуждали перед этим.
Если не понятно и короче говоря:
Почему первый зазор не отображается в cue, а остальные отображаются?
Цитата:
Я уже давно не делаю образы с помощью foobar2000. C помощью него я конвертирую полученные с помощью EAC wav треки в flac образ. foobar2000 здесь используется всего лишь как графический надстройщик над flac.exe. Не вижу в этом ничего плохого.
Добавлено:
XXxxalllexxXX
Свои диски есть, но совсем мало - около 50 шт. Если этого достаточно, буду признателен за приглашение.
Перечитайте снова мое сообщение и при этом забудьте все что мы обсуждали перед этим.
Если не понятно и короче говоря:
Почему первый зазор не отображается в cue, а остальные отображаются?
Цитата:
Ну и не надо забывать, что для себя ты можешь делать как угодно. Но другим предлагать фубаровский образ не рекомендую Я вот точно не возьму
Я уже давно не делаю образы с помощью foobar2000. C помощью него я конвертирую полученные с помощью EAC wav треки в flac образ. foobar2000 здесь используется всего лишь как графический надстройщик над flac.exe. Не вижу в этом ничего плохого.
Добавлено:
XXxxalllexxXX
Свои диски есть, но совсем мало - около 50 шт. Если этого достаточно, буду признателен за приглашение.
ArtemijG
Достаточно. Вот фак по настройке [more=EAC]Guide
Download link: http://www.exactaudiocopy.de/en/index.php/resources/download/
Current version as of this guide: EAC 1.0 Beta 3.
Step 1: Download and install EAC
Download the installer and fire it up.
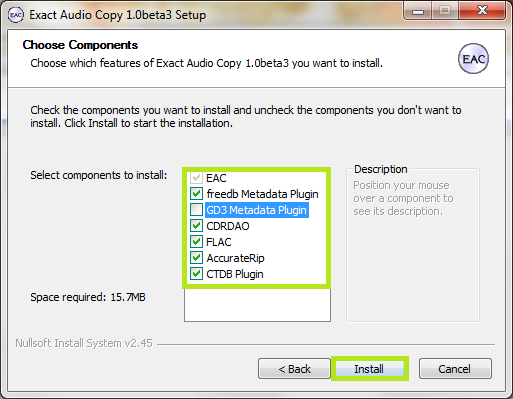
Eventually you'll get to a screen like this. Make sure you install AccurateRip, CDRDAO, CTDB and freedb as a bare minimum. FLAC will be useful as well if you don't have it separately installed. GD3 is only useful if you want to pay for metadata results. I assume you don't.
Note: The above screenshot is from Beta 3. The new Beta 3 adds the option to include the CueTools Database Plugin. It is recommended to install it but not required. Full details for installation of the plugin on older versions is located in the appendix at the end of this guide.
Step 2: Start EAC
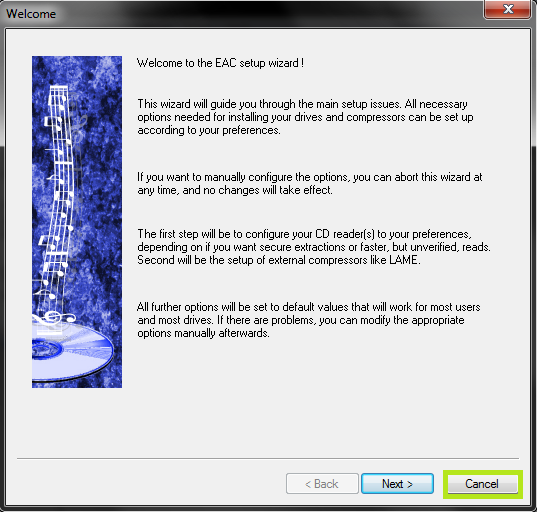
When you first start EAC, you'll see a screen like this one. Hit "Cancel". Next, put a popular CD into your drive, preferably not one that was recently released (a few months old at least). You'll see a window like the one below appear. If you have an older version of EAC or dBpoweramp installed, it's likely AccurateRip was already configured, and this may not appear.
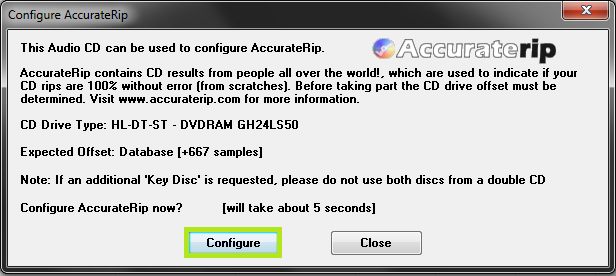
Hit Configure. It may take a few minutes. Hit "Ok" afterward. Once again, if you have an older version of EAC or dBpoweramp installed, it's likely AccurateRip was already configured, and this may not appear.
Step 3: EAC Options
All of the options dialogs can be found from the EAC menu at the top of the screen.
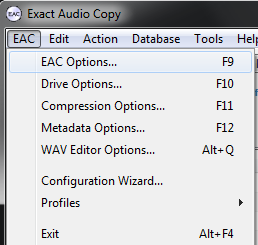
Start with EAC Options. Any tabs not pictured are completely optional settings, or are irrelevant to ripping.
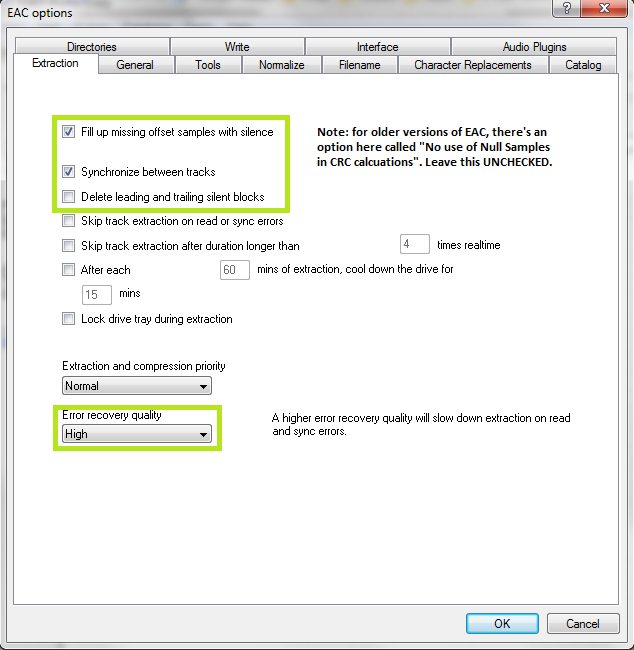
Make sure you set the green highlighted settings as shown. If you're using an older version of EAC, make sure "No use of null samples for CRC calculations is UNCHECKED. The rest is optional, choose as you will. Locking the drive tray during extraction isn't a bad idea though.
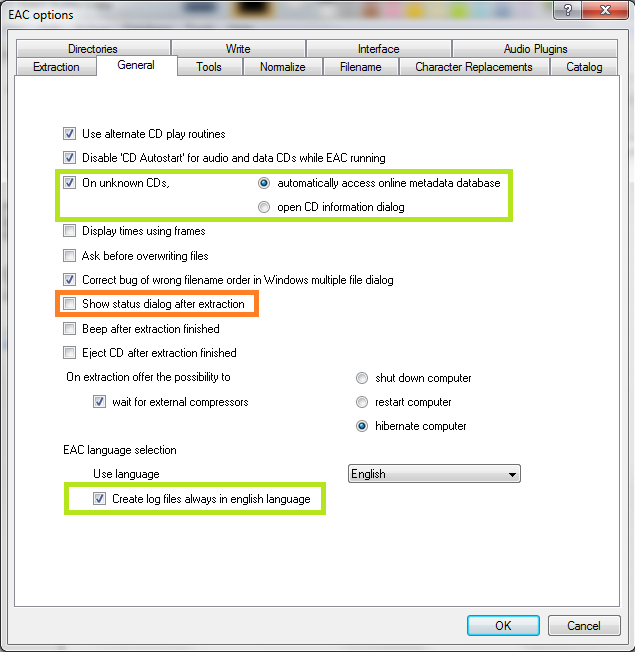
These settings are pretty much all optional and self explanatory. I'd recommend using Alternate CD play routines and disabling autostart though.
The "Create log files always in english language" is very important for our international users. This will let you keep EAC's language as your native one, but write the log file in English, allowing it to pass our logchecker without needing to be rescored manually.
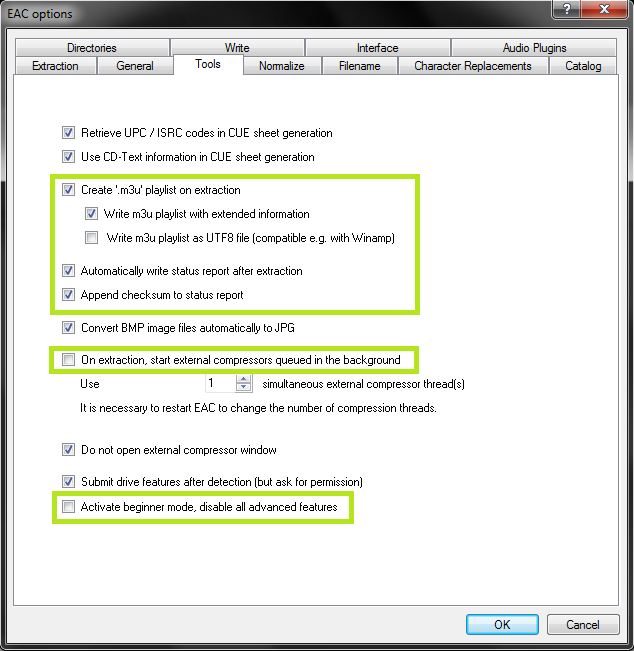
If your drive is capable of reading UPC/ISRC codes and CD-Text (you can only really figure this out by trial and error), you're welcome to keep the top two options checked. Otherwise, uncheck them.
Other than that, these settings are pretty much ideal. I wouldn't recommend using more than 1 compressor thread even if you have a multicore computer. It doesn't take very long compared to the track extraction anyway. Note that in tests run by punkmeup, disabling the queue of external compressors in the background fixed an issue where EAC was generating WAV files instead of FLAC, so I've made that a required option. It should have no bearing on the rip quality. If rip queueing works for you (it does for me), feel free to leave it enabled.
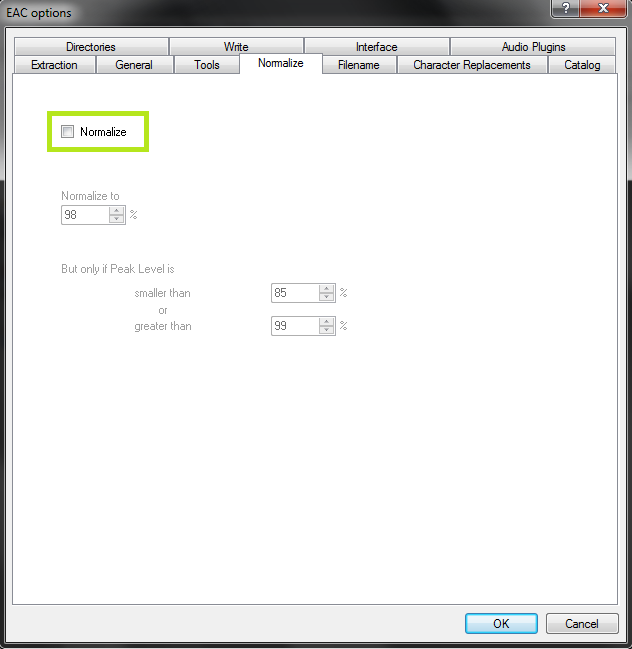
Friends don't let friends normalize their EAC rips. Don't ever do it. It will instantly be given a 0% by the logchecker.
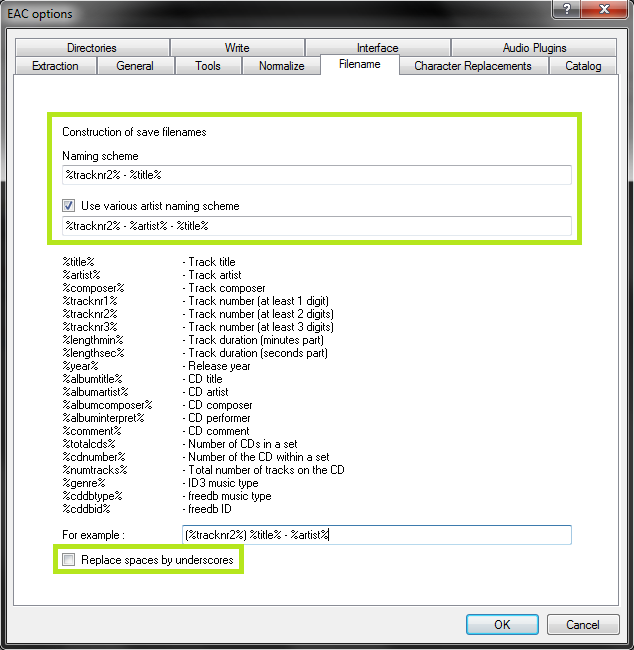
As shown in the screenshot above here is the proper way to name tracks.
Naming Convention : %tracknr2% - %title%
Check 'Use Various Artists Naming Scheme' and use : %tracknr2% - %artist% - %title%
The only difference acceptable here would be perhaps %tracknr2%. %title% if you prefer periods instead of dashes in the filenames. If you need track numbers to go into triple digits for some reason, use %tracknr3% instead.
Don't replace spaces by underscores. It looks ridiculous.
A note on directory naming schemes:: Show
Step 4: Drive Options
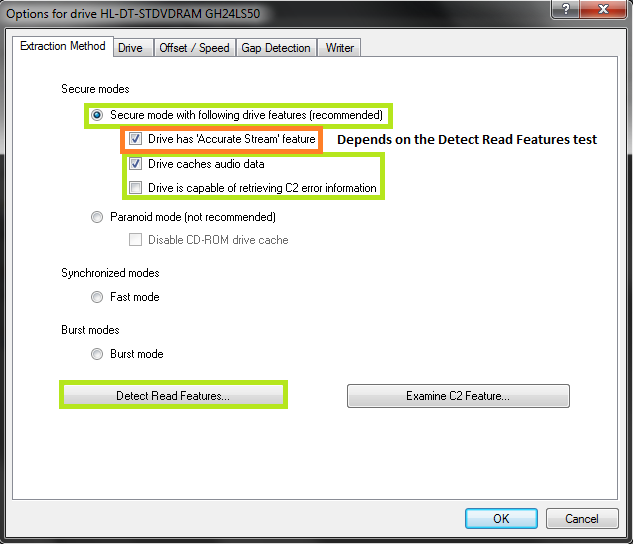
Start by hitting "Detect Read Features...". This will actually take a few minutes. The only feature detection that actually matters is Accurate Stream. If your drive can use it, checkmark the setting (most modern drives have Accurate Stream). If it can't, don't.
Even if your drive doesn't cache audio, just do us a favour and leave that checked. Not only will it stop you from having to have each of your uploads rescored by hand, but it doesn't affect the audio quality at all. Yes, the rips take a bit longer with that setting enabled. Go watch TV or something while you wait.
Do not use C2, even if EAC thinks you can. Most drives have terrible C2 error implementation.
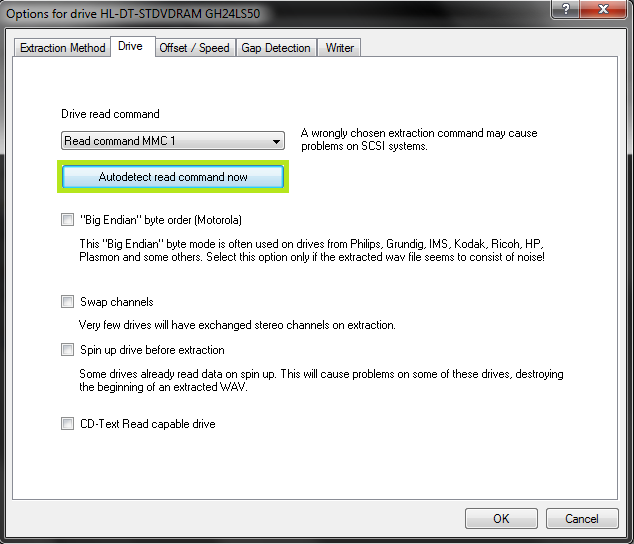
Hit "Autodetect read command now". It shouldn't take long. Leave everything else unchecked unless you're having problems. You can checkmark "CD-Text Read capable drive" if you want to test whether your drive can do it. If it can, great, otherwise, uncheck it. It's unlikely you'll ever use that feature anyway.
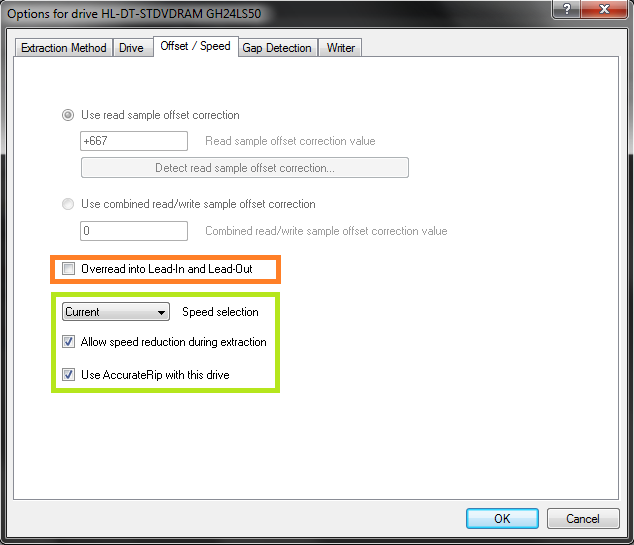
If you did the AccurateRip configuration at the start of this guide, the top half here will be greyed out. If not, you'll need to find your read offset correction from this list. Don't use a combined read/write offset.
If you want to figure out whether your drive needs "Overread into Lead-in and Lead-Out" checked, you can check by temporarily unchecking "Use AccurateRip with this drive". Stick a CD in the drive and hit "Detect read sample offset correction...". If you're just doing this for the Overread, see below:
blowfish.be wrote:
Check "Overread Lead-In and Lead-Out" only if the test result says that your drive can overread from both the Lead-In and Lead-Out, or if it says Lead-Out and your offset correction is positive ,or if it says Lead-In and your offset correction is negative. Otherwise disable (uncheck) it.
Remember to check "Use AccurateRip with this drive" again once you're finished. AccurateRip is necessary for a 100% log.
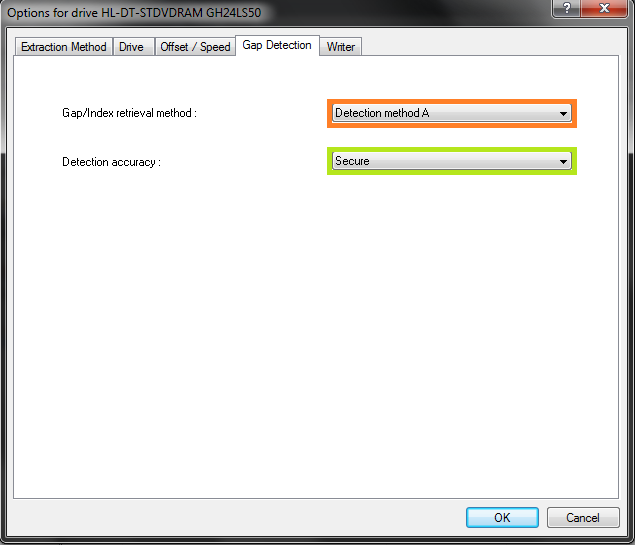
Pretty much every drive should work with the settings shown. If yours stalls on detecting gaps or detects gaps that are obviously wrong (like 30 second gaps on a non-live album), try Detection method B or C. If A, B, and C all fail, you can switch "Secure" to "Accurate" and try again.
Step 5: Metadata Options
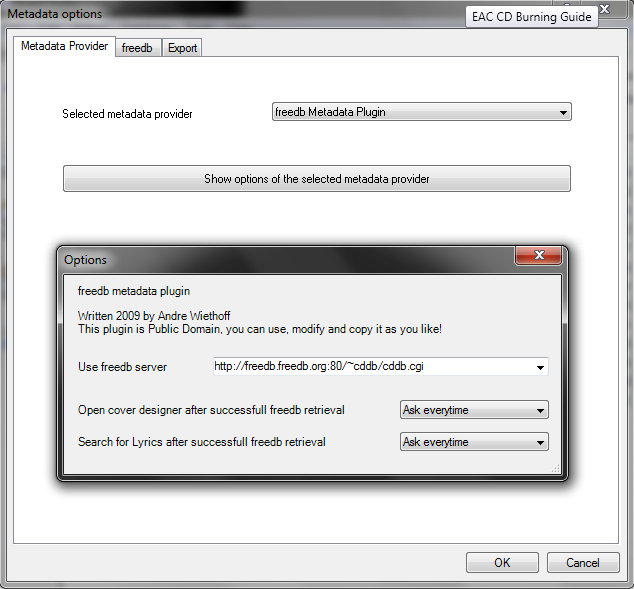
Here's where you pick your metadata provider. If you did install GD3, it'll be in the list. You can only rip 10 discs before you have to pay for a subscription though. Otherwise, you have a choice between the MusicBrainz plugin (CTDB), freedb plugin and EAC's native freedb support. I'm not really sure what the big difference is, I'm guessing it's the cover+lyrics. Anyway, change those settings above if you wish.
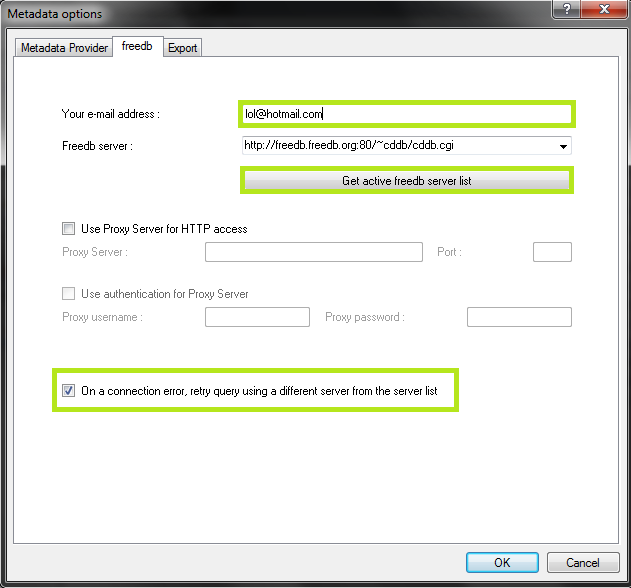
If you use EAC's native freedb instead, the settings should look like this. Make sure you put an email at the top, it doesn't need to be real. Hit "Get active freedb server list". Then checkmark the last option.
Step 6: Compression Options
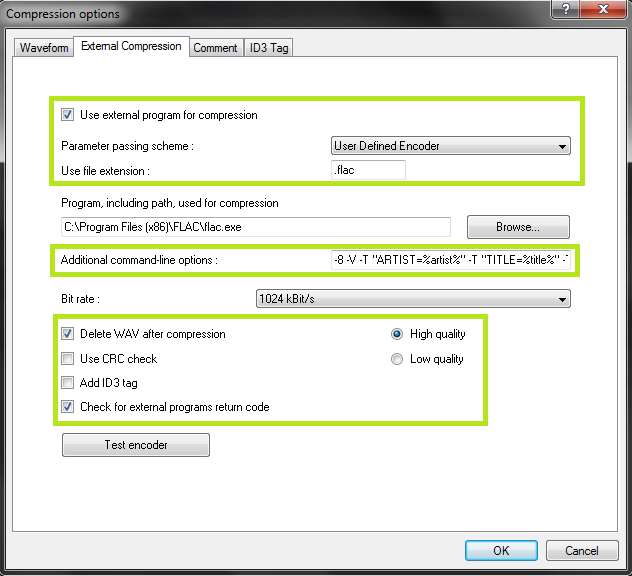
Set up this tab exactly as shown. You'll have to browse to the path where you have flac.exe, if you installed it with EAC it's in C:\Program Files (x86)\Exact Audio Copy\FLAC\flac.exe. If you installed it separately it's wherever you installed it. The bitrate and high/low quality have no effect on the rip.
The commandline parameters have changed in this version, so this will look new to most of you. The commandline recommended for optimal completeness is this:
-8 -V -T "ARTIST=%artist%" -T "TITLE=%title%" -T "ALBUM=%albumtitle%" -T "DATE=%year%" -T "TRACKNUMBER=%tracknr%" -T "GENRE=%genre%" -T "PERFORMER=%albuminterpret%" -T "COMPOSER=%composer%" %haslyrics%--tag-from-file=LYRICS="%lyricsfile%"%haslyrics% -T "ALBUMARTIST=%albumartist%" -T "DISCNUMBER=%cdnumber%" -T "TOTALDISCS=%totalcds%" -T "TOTALTRACKS=%numtracks%" -T "COMMENT=%comment%" %source% -o %dest%
It takes no extra effort on your part, just copy and paste that into the additional commandline options and you're done.
Note: the %comment% function is broken in version 1.0b2 (it returns the track CRC). Use something like -T "COMMENT=EAC V1.0 beta 2, Secure Mode, Test & Copy, AccurateRip, FLAC -8" instead.
Also, as of Beta 3 you may use the %tracknr1% variable instead of %tracknr% if you would like to have no leading zeroes in the track number field (like XLD does). tracknr1 will use, for example, '1' instead of '01'.
A note on the FLAC commandline in versions prior to 1.0b3: Show
A note on ripping to lossy formats like MP3: Show
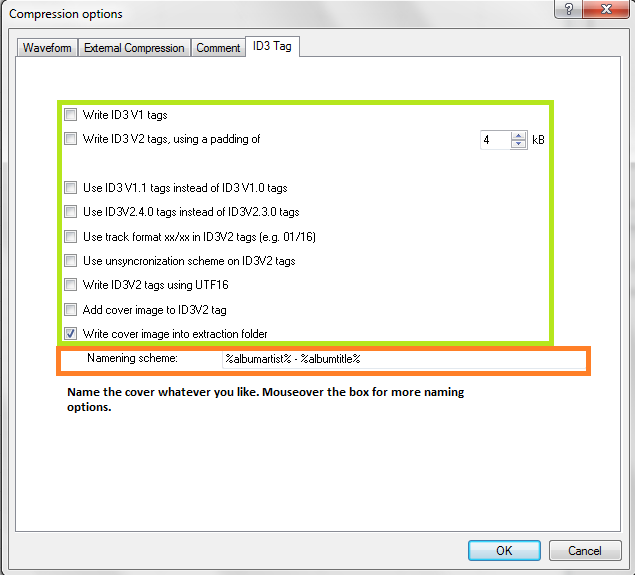
Leave everything unchecked except the last option.
Congrats! EAC is now properly set up! You may wish to save your settings in a profile by hitting "New" at the bottom of the screen. However, unless you're changing your settings frequently there's no need, EAC will remember all of this on next launch regardless.
Step 1: Tagging
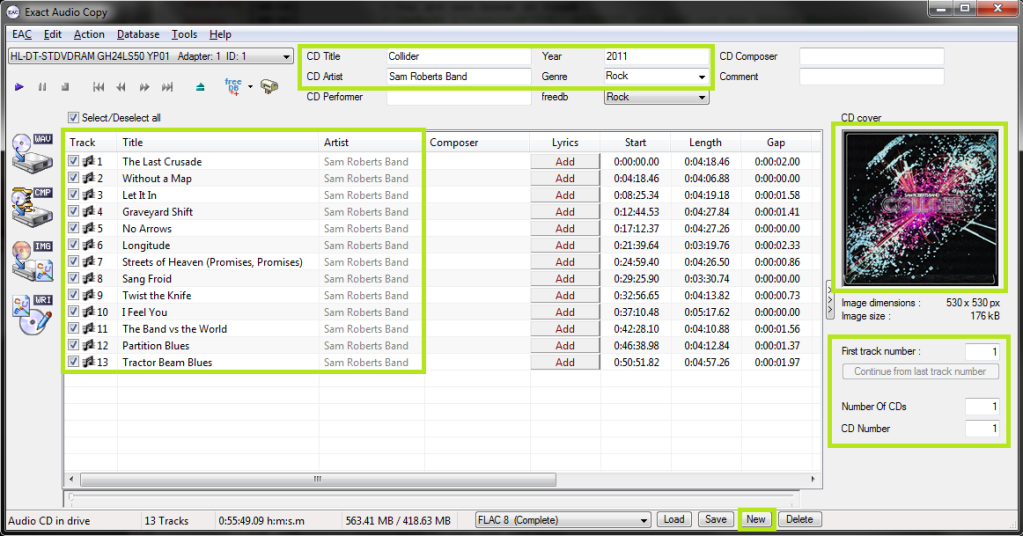
So now let's look at the main window. Be sure everything is named correctly here, as these will be the tags on your ripped files. If you're ripping a classical CD, you may wish to fill in the Composer/Performer fields.
Drag a cover image into the EAC window. I think ~500x500 is a decent size in most cases. Google images is your friend here.
If you're ripping a box set, you may wish to use the options under the cover image, otherwise leave them all as "1".
Finally, if you want to add lyrics to the tracks, use the "Lyrics" button.
Note: I've also highlighted the "New" button where you can save your settings. This is not a necessary step each time you rip.
Step 2: Gap Detection and Cuesheets
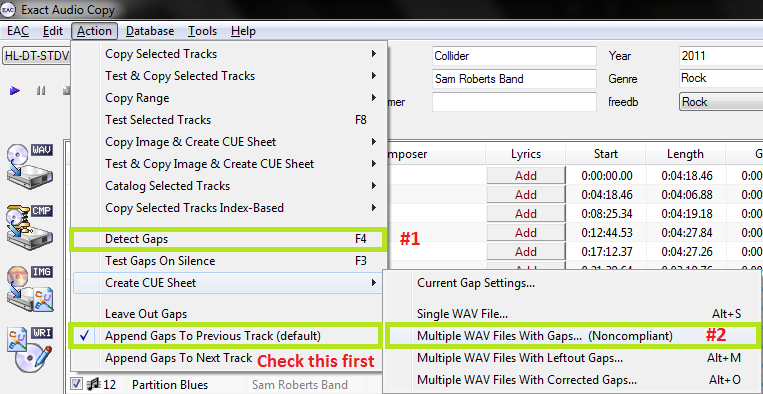
The pre-rip stuff happens here. Make sure "Append Gaps to Previous Track (default)" is checked. It should be. Next, hit the options in the order shown.
First, hit "Detect Gaps". This is very important, your rip will fail the logchecker if you do not complete this step. If the first track is highlighted in red, you have a hidden track. You'll want to look at this section of the blowfish.be guide.
Next, go to Create CUE Sheet -> Multiple WAV Files With Gaps... (Noncompliant). This is usually where I create the folder for ripping as well. Do NOT rip your tracks to any directory containing your name. You should NEVER edit a log for any reason, especially now that we have checksums. A simple C:\EAC Rips is fine.
I name my directories as follows:
Artist - Album (Year) [Format] {Extra}
So for example, with the album in the screenshots, it'd be
Sam Roberts Band - Collider (2011) [FLAC] {UMC 0252764577}
However, as long as it contains the album name and no nested folders (don't do \Artist\Album\), you're fine by the rules here.
Anyway, make the folder, save the .cue file into it. I usually just name mine Noncompliant.cue, it doesn't really matter.
A note on directory naming schemes and cuesheets:: Show
Step 3: Ripping
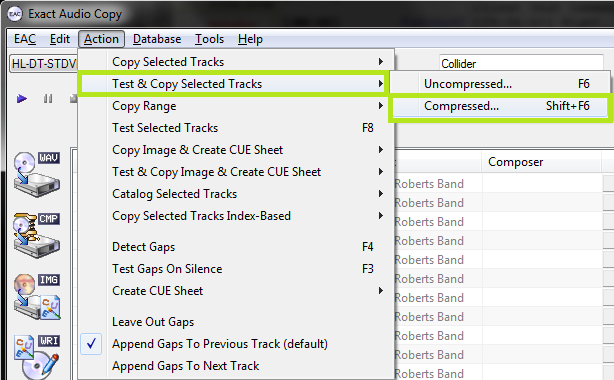
Finally, the rip itself! Make sure all the tracks are checkmarked in the main window unless there are some you don't want to rip.
Test & Copy -> Compressed.
Depending on your drive and whether or not the CD is scratched, this could take anywhere from ten minutes to four hours. Be patient.[/more]
Достаточно. Вот фак по настройке [more=EAC]Guide
Download link: http://www.exactaudiocopy.de/en/index.php/resources/download/
Current version as of this guide: EAC 1.0 Beta 3.
Step 1: Download and install EAC
Download the installer and fire it up.

Eventually you'll get to a screen like this. Make sure you install AccurateRip, CDRDAO, CTDB and freedb as a bare minimum. FLAC will be useful as well if you don't have it separately installed. GD3 is only useful if you want to pay for metadata results. I assume you don't.
Note: The above screenshot is from Beta 3. The new Beta 3 adds the option to include the CueTools Database Plugin. It is recommended to install it but not required. Full details for installation of the plugin on older versions is located in the appendix at the end of this guide.
Step 2: Start EAC

When you first start EAC, you'll see a screen like this one. Hit "Cancel". Next, put a popular CD into your drive, preferably not one that was recently released (a few months old at least). You'll see a window like the one below appear. If you have an older version of EAC or dBpoweramp installed, it's likely AccurateRip was already configured, and this may not appear.

Hit Configure. It may take a few minutes. Hit "Ok" afterward. Once again, if you have an older version of EAC or dBpoweramp installed, it's likely AccurateRip was already configured, and this may not appear.
Step 3: EAC Options
All of the options dialogs can be found from the EAC menu at the top of the screen.

Start with EAC Options. Any tabs not pictured are completely optional settings, or are irrelevant to ripping.

Make sure you set the green highlighted settings as shown. If you're using an older version of EAC, make sure "No use of null samples for CRC calculations is UNCHECKED. The rest is optional, choose as you will. Locking the drive tray during extraction isn't a bad idea though.

These settings are pretty much all optional and self explanatory. I'd recommend using Alternate CD play routines and disabling autostart though.
The "Create log files always in english language" is very important for our international users. This will let you keep EAC's language as your native one, but write the log file in English, allowing it to pass our logchecker without needing to be rescored manually.

If your drive is capable of reading UPC/ISRC codes and CD-Text (you can only really figure this out by trial and error), you're welcome to keep the top two options checked. Otherwise, uncheck them.
Other than that, these settings are pretty much ideal. I wouldn't recommend using more than 1 compressor thread even if you have a multicore computer. It doesn't take very long compared to the track extraction anyway. Note that in tests run by punkmeup, disabling the queue of external compressors in the background fixed an issue where EAC was generating WAV files instead of FLAC, so I've made that a required option. It should have no bearing on the rip quality. If rip queueing works for you (it does for me), feel free to leave it enabled.

Friends don't let friends normalize their EAC rips. Don't ever do it. It will instantly be given a 0% by the logchecker.

As shown in the screenshot above here is the proper way to name tracks.
Naming Convention : %tracknr2% - %title%
Check 'Use Various Artists Naming Scheme' and use : %tracknr2% - %artist% - %title%
The only difference acceptable here would be perhaps %tracknr2%. %title% if you prefer periods instead of dashes in the filenames. If you need track numbers to go into triple digits for some reason, use %tracknr3% instead.
Don't replace spaces by underscores. It looks ridiculous.
A note on directory naming schemes:: Show
Step 4: Drive Options

Start by hitting "Detect Read Features...". This will actually take a few minutes. The only feature detection that actually matters is Accurate Stream. If your drive can use it, checkmark the setting (most modern drives have Accurate Stream). If it can't, don't.
Even if your drive doesn't cache audio, just do us a favour and leave that checked. Not only will it stop you from having to have each of your uploads rescored by hand, but it doesn't affect the audio quality at all. Yes, the rips take a bit longer with that setting enabled. Go watch TV or something while you wait.
Do not use C2, even if EAC thinks you can. Most drives have terrible C2 error implementation.

Hit "Autodetect read command now". It shouldn't take long. Leave everything else unchecked unless you're having problems. You can checkmark "CD-Text Read capable drive" if you want to test whether your drive can do it. If it can, great, otherwise, uncheck it. It's unlikely you'll ever use that feature anyway.

If you did the AccurateRip configuration at the start of this guide, the top half here will be greyed out. If not, you'll need to find your read offset correction from this list. Don't use a combined read/write offset.
If you want to figure out whether your drive needs "Overread into Lead-in and Lead-Out" checked, you can check by temporarily unchecking "Use AccurateRip with this drive". Stick a CD in the drive and hit "Detect read sample offset correction...". If you're just doing this for the Overread, see below:
blowfish.be wrote:
Check "Overread Lead-In and Lead-Out" only if the test result says that your drive can overread from both the Lead-In and Lead-Out, or if it says Lead-Out and your offset correction is positive ,or if it says Lead-In and your offset correction is negative. Otherwise disable (uncheck) it.
Remember to check "Use AccurateRip with this drive" again once you're finished. AccurateRip is necessary for a 100% log.

Pretty much every drive should work with the settings shown. If yours stalls on detecting gaps or detects gaps that are obviously wrong (like 30 second gaps on a non-live album), try Detection method B or C. If A, B, and C all fail, you can switch "Secure" to "Accurate" and try again.
Step 5: Metadata Options

Here's where you pick your metadata provider. If you did install GD3, it'll be in the list. You can only rip 10 discs before you have to pay for a subscription though. Otherwise, you have a choice between the MusicBrainz plugin (CTDB), freedb plugin and EAC's native freedb support. I'm not really sure what the big difference is, I'm guessing it's the cover+lyrics. Anyway, change those settings above if you wish.

If you use EAC's native freedb instead, the settings should look like this. Make sure you put an email at the top, it doesn't need to be real. Hit "Get active freedb server list". Then checkmark the last option.
Step 6: Compression Options

Set up this tab exactly as shown. You'll have to browse to the path where you have flac.exe, if you installed it with EAC it's in C:\Program Files (x86)\Exact Audio Copy\FLAC\flac.exe. If you installed it separately it's wherever you installed it. The bitrate and high/low quality have no effect on the rip.
The commandline parameters have changed in this version, so this will look new to most of you. The commandline recommended for optimal completeness is this:
-8 -V -T "ARTIST=%artist%" -T "TITLE=%title%" -T "ALBUM=%albumtitle%" -T "DATE=%year%" -T "TRACKNUMBER=%tracknr%" -T "GENRE=%genre%" -T "PERFORMER=%albuminterpret%" -T "COMPOSER=%composer%" %haslyrics%--tag-from-file=LYRICS="%lyricsfile%"%haslyrics% -T "ALBUMARTIST=%albumartist%" -T "DISCNUMBER=%cdnumber%" -T "TOTALDISCS=%totalcds%" -T "TOTALTRACKS=%numtracks%" -T "COMMENT=%comment%" %source% -o %dest%
It takes no extra effort on your part, just copy and paste that into the additional commandline options and you're done.
Note: the %comment% function is broken in version 1.0b2 (it returns the track CRC). Use something like -T "COMMENT=EAC V1.0 beta 2, Secure Mode, Test & Copy, AccurateRip, FLAC -8" instead.
Also, as of Beta 3 you may use the %tracknr1% variable instead of %tracknr% if you would like to have no leading zeroes in the track number field (like XLD does). tracknr1 will use, for example, '1' instead of '01'.
A note on the FLAC commandline in versions prior to 1.0b3: Show
A note on ripping to lossy formats like MP3: Show

Leave everything unchecked except the last option.
Congrats! EAC is now properly set up! You may wish to save your settings in a profile by hitting "New" at the bottom of the screen. However, unless you're changing your settings frequently there's no need, EAC will remember all of this on next launch regardless.
Step 1: Tagging

So now let's look at the main window. Be sure everything is named correctly here, as these will be the tags on your ripped files. If you're ripping a classical CD, you may wish to fill in the Composer/Performer fields.
Drag a cover image into the EAC window. I think ~500x500 is a decent size in most cases. Google images is your friend here.
If you're ripping a box set, you may wish to use the options under the cover image, otherwise leave them all as "1".
Finally, if you want to add lyrics to the tracks, use the "Lyrics" button.
Note: I've also highlighted the "New" button where you can save your settings. This is not a necessary step each time you rip.
Step 2: Gap Detection and Cuesheets

The pre-rip stuff happens here. Make sure "Append Gaps to Previous Track (default)" is checked. It should be. Next, hit the options in the order shown.
First, hit "Detect Gaps". This is very important, your rip will fail the logchecker if you do not complete this step. If the first track is highlighted in red, you have a hidden track. You'll want to look at this section of the blowfish.be guide.
Next, go to Create CUE Sheet -> Multiple WAV Files With Gaps... (Noncompliant). This is usually where I create the folder for ripping as well. Do NOT rip your tracks to any directory containing your name. You should NEVER edit a log for any reason, especially now that we have checksums. A simple C:\EAC Rips is fine.
I name my directories as follows:
Artist - Album (Year) [Format] {Extra}
So for example, with the album in the screenshots, it'd be
Sam Roberts Band - Collider (2011) [FLAC] {UMC 0252764577}
However, as long as it contains the album name and no nested folders (don't do \Artist\Album\), you're fine by the rules here.
Anyway, make the folder, save the .cue file into it. I usually just name mine Noncompliant.cue, it doesn't really matter.
A note on directory naming schemes and cuesheets:: Show
Step 3: Ripping

Finally, the rip itself! Make sure all the tracks are checkmarked in the main window unless there are some you don't want to rip.
Test & Copy -> Compressed.
Depending on your drive and whether or not the CD is scratched, this could take anywhere from ten minutes to four hours. Be patient.[/more]
ArtemijG
По моей логике, первый зазор не отображается потому, что с другой стороны его ничего нет
Зазор между чем и чем?
По моей логике, первый зазор не отображается потому, что с другой стороны его ничего нет

Зазор между чем и чем?
MikeN
Цитата:
Зазор перед первым треком.
Добавлено:
XXxxalllexxXX
Прочитал инструкцию. Спасибо.
А есть ли аналог EAC под линукс? Или лучшее решение это Wine?
Цитата:
Зазор между чем и чем?
Зазор перед первым треком.
Добавлено:
XXxxalllexxXX
Прочитал инструкцию. Спасибо.
А есть ли аналог EAC под линукс? Или лучшее решение это Wine?
ArtemijG
Цитата:
Цитата:
есть ли аналог EAC под линукс? Или лучшее решение это Wine?Насколько мне известно ничего достойного на данный момент нет
ArtemijG
Цитата:
Оно самое.
Цитата:
Или лучшее решение это Wine?
Оно самое.
ArtemijG
Ты не понял. Расстояние бывает только между первой и второй точками - перед первой никакого расстояния нет.
Так и с зазорами - они измеряются только между треками
Ты не понял. Расстояние бывает только между первой и второй точками - перед первой никакого расстояния нет.
Так и с зазорами - они измеряются только между треками

Вот интересно, почему на трекерах не требуют скриншота спектра частот полученного в EAC? Вместо этого требуют спектры полученные с помощью других программ.
Добавлено:
Возможно как либо сохранить спектр сделанный в EAC не делая скриншота?
Добавлено:
Возможно как либо сохранить спектр сделанный в EAC не делая скриншота?
И еще вопрос по отчёту EAC.
Test CRC 127C815F
Copy CRC 51863392
Copy OK
Это нормально?
Test CRC 127C815F
Copy CRC 51863392
Copy OK
Это нормально?
ArtemijG
Нет.
Нет.
Страницы: 1234567891011121314151617181920212223242526272829303132333435363738394041424344454647484950515253545556
Предыдущая тема: Winamp - все версии
Форум Ru-Board.club — поднят 15-09-2016 числа. Цель - сохранить наследие старого Ru-Board, истории становления российского интернета. Сделано для людей.
